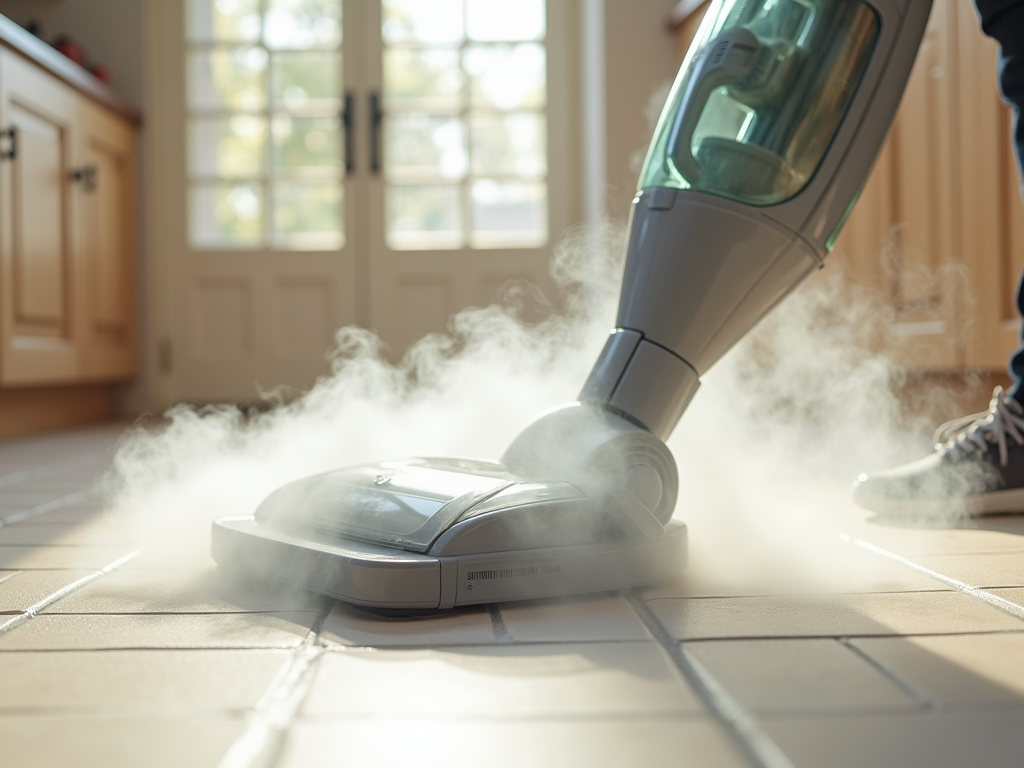
How to Steam Clean Grout
Steam cleaning grout is an efficient way to restore your tiled surfaces, removing dirt, mold, and tough stains without the use of harsh chemicals. This article will guide you through the process of steam cleaning grout effectively, ensuring your floors and walls look as good as new. We’ll delve into the necessary tools, step-by-step instructions, and best practices to follow for optimal results. With the right techniques, steam cleaning can be an easy and effective way to maintain your home.
Tools and Materials Needed
Before embarking on your steam cleaning journey, it’s essential to gather all the tools and materials necessary for the job. Having everything on hand can streamline the process and lead to better results. Here’s what you’ll need:
- Steam Cleaner: A high-quality steam cleaner with a nozzle attachment is imperative for getting into the grout lines.
- Grout Brush: A stiff-bristled brush will help scrub away any remaining dirt or stains after steaming.
- Microfiber Cloths: These are useful for wiping down surfaces post-cleaning.
- Safety Equipment: If your steam cleaner emits high temperatures, consider wearing gloves and protective eyewear to safeguard against burns or splashes.
- Optional Cleaning Solution: Depending on the state of your grout, a mild cleaning solution can be used alongside the steam cleaning process.
Preparing Your Space

Preparing your area before you start steam cleaning is crucial to achieving the best results. First, you’ll want to remove all furniture and items from the area being cleaned to provide ample space to work. Next, thoroughly vacuum the floors to eliminate any loose dirt and debris. This step helps the steam cleaner to be more effective in loosening stubborn grime in the grout lines. Additionally, check your steam cleaner’s water reservoir and fill it with distilled water as recommended by the manufacturer. Once everything is cleared and vacuumed, your area will be primed for a thorough cleaning.
Once you have your tools ready and your space prepared, it’s time to dive into the actual steam cleaning process. Here’s a straightforward step-by-step guide to help you along the way:
- Turn on the Steam Cleaner: Ensure the machine is heated up for optimal cleaning efficiency.
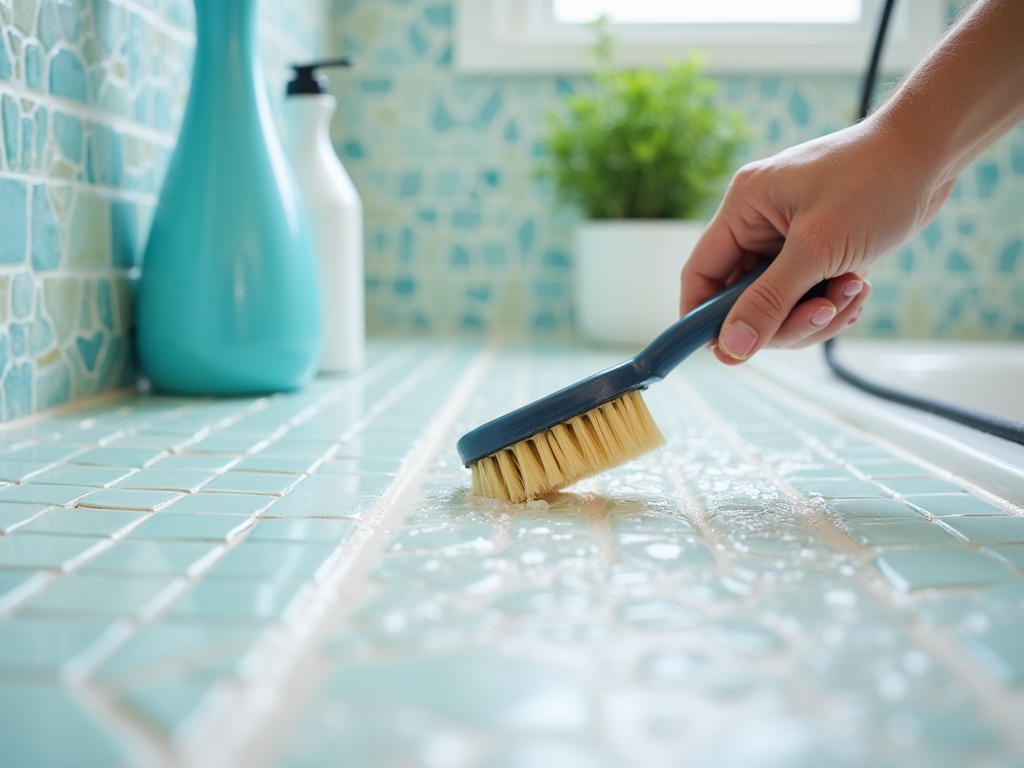
- Apply Steam: Holding the steam cleaner’s nozzle close to the grout, begin applying steam, moving in small sections. Do not linger too long in one spot to avoid damage.
- Scrub the Grout: Use the grout brush to scrub the lines after applying steam, ensuring that you are working in small sections.
- Wipe Down Surface: Use a microfiber cloth to wipe away loosened dirt, ensuring a clean finish.
- Repeat as Necessary: If the grout is particularly stained, repeat the steaming and scrubbing process until the desired cleanliness is achieved.
Best Practices for Grout Maintenance
Once you’ve successfully steamed the grout clean, it’s important to maintain the results over time. Regular cleaning not only keeps your grout looking fresh but also extends its lifespan. Here are some best practices to consider:
- Regular Cleaning: Schedule periodic cleanings every few months to prevent dirt buildup.
- Use Doormats: Place doormats at entry points to minimize dirt tracked into your home.
- Seal the Grout: After cleaning, consider sealing your grout to protect against future stains.
- Avoid Harsh Chemicals: Stick to mild cleaning solutions, as harsh chemicals can damage both grout and surrounding tiles.
- Prompt Attention to Spills: Address spills and stains immediately to prevent them from setting into the grout.
Conclusion
Steam cleaning grout is a powerful method to rejuvenate your tiled surfaces while remaining eco-friendly and cost-effective. With the right tools, preparation, and techniques, you’ll not only get rid of dirt and stains but also maintain the aesthetic appeal of your home. Regular upkeep and preventive measures are key to keeping your grout and tiles both clean and durable.
Frequently Asked Questions
1. How often should I steam clean my grout?
It’s recommended to steam clean your grout every 3 to 6 months, depending on the traffic in the area and the extent of dirt accumulation.
2. Can I use a steam cleaner on all types of grout?
Most types of grout can be steam cleaned; however, older or damaged grout may be more susceptible to damage. It’s best to test a small area first.
3. Do I need to use cleaning solutions with steam cleaning?
While steam cleaning is often enough, using a mild cleaning solution can enhance effectiveness, especially for heavily stained grout.
4. Will steam cleaning damage my tiles?
When used correctly, steam cleaning does not damage tiles. However, avoid focusing on one area for too long and ensure your cleaner is appropriate for your tile type.
5. Is steam cleaning grout safe for pets and children?
Yes, since steam cleaning uses water and heat, it’s a safe option for homes with pets and children, provided you allow the surfaces to cool before letting them access the area.

How to Clean a Keurig With Vinegar in Just 20 Minutes for Better Tasting Coffee
If you’re wondering how to clean a Keurig using vinegar, you’re in the right place. Using vinegar is an effective and natural way to remove calcium deposits and mineral buildup that can affect the taste of your coffee. Not only does this process enhance the flavor of your brew, but it also prolongs the life of your machine. In this article, we’ll guide you through a step-by-step cleaning process that takes just 20 minutes, ensuring that your coffee comes out tasting fresh and delicious every time.
Why Cleaning Your Keurig is Essential

Regular maintenance of your Keurig is crucial for several reasons, all of which directly affect your coffee’s flavor and the longevity of the machine.
- Improves Coffee Taste: Residual coffee oils and mineral deposits can make your coffee taste stale or bitter.
- Prevents Clogs: Regular cleaning prevents clogs in the water lines and brewing components.
- Extends Machine Life: By keeping your machine clean, you reduce wear and tear on its components.
- Avoids Bacteria Growth: Stagnant water and coffee remnants can lead to harmful bacteria growth.
- Maintains Brew Quality: A clean machine consistently produces better quality coffee.
Gather Your Supplies

Before diving into the cleaning process, it’s important to prepare the necessary supplies. You won’t need much—just a few common items that you likely already have at home. Gather the following:
- White vinegar (about 10 ounces)
- Water (about 10 ounces)
- A clean mug or container
- A soft cloth or sponge
- Optional: descaling solution if desired
By having these supplies ready, you ensure a swift and efficient cleaning process. This allows you to focus on the procedure rather than hunting down items in your kitchen. Once your supplies are gathered, you’re just a few steps away from rejuvenating your beloved Keurig.
Step-by-Step Guide to Cleaning Your Keurig
To clean your Keurig with vinegar, follow this straightforward, step-by-step guide. Make sure your machine is unplugged for safety before you begin:
- Prepare the Machine: Remove the water reservoir and any used coffee pods. Rinse the reservoir with warm water to remove any coffee residue.
- Mix Your Cleaning Solution: Combine equal parts of white vinegar and water (10 ounces each) in the reservoir.
- Run the Cleaning Cycle: Place your mug on the drip tray and brew a cup without inserting a pod. Discard the liquid once it fills your mug. Repeat this process until the reservoir is empty.
- Rinse the Reservoir: After using the vinegar solution, rinse the reservoir thoroughly with fresh water to remove any vinegar smell.
- Flush with Fresh Water: Fill the reservoir with clean water and brew several cups to ensure no vinegar taste remains.
These steps should take around 20 minutes in total, making this method not only efficient but also easy to fit into your routine. The use of vinegar not only cleans but also helps eliminate any unpleasant odors that may have built up in your machine.
Tips for Ongoing Maintenance
To keep your Keurig in peak condition, it’s essential to implement an ongoing maintenance routine. Below are some helpful tips that can help you maintain the cleanliness of your coffee maker:
- Regular Cleaning: Aim to clean your Keurig every 3-6 months, or more frequently if you use it multiple times a day.
- Use Purified Water: If possible, use filtered or purified water to reduce mineral deposits.
- Wipe Down External Parts: Regularly wipe down the exterior with a soft cloth to prevent dust and grime buildup.
- Replace Water Regularly: Don’t let water sit in the reservoir for long periods; replace it every few days if not in use.
- Check for Software Updates: Some Keurig machines have software updates to enhance functionality and performance.
Conclusion
Cleaning your Keurig with vinegar is a quick and effective way to ensure that your coffee tastes its best. By following the steps outlined in this article, you can efficiently remove buildup and prolong the lifespan of your machine. Regular maintenance not only keeps your coffee tasting delicious but also prevents issues that could lead to expensive repairs. Make it a routine, and enjoy the rich flavors of fresh coffee made from a clean Keurig!
Frequently Asked Questions
1. How often should I clean my Keurig?
It’s recommended to clean your Keurig every 3-6 months, depending on how often you use it.
2. Can I use apple cider vinegar instead of white vinegar?
While white vinegar is preferred, you can use apple cider vinegar as a substitute. However, ensure it’s well diluted and rinsed thoroughly afterward.
3. Will cleaning with vinegar damage my Keurig?
No, vinegar is safe for cleaning your Keurig. Just make sure to rinse the reservoir thoroughly after cleaning to avoid any vinegar taste in your coffee.
4. What can I do if my Keurig still doesn’t brew properly after cleaning?
If your Keurig isn’t brewing properly after cleaning, it may require further maintenance or have a different issue, such as a clogged needle. Consider consulting the manufacturer’s guidelines or seeking professional help.
5. Is there an alternative to vinegar for cleaning a Keurig?
Yes, you can use a descaling solution specifically designed for coffee makers as an alternative to vinegar. Follow the manufacturer’s instructions for the best results.
How to Clean Walls Without Damaging Your Paint
Cleaning walls is essential for maintaining a fresh and inviting environment in your home. However, improper cleaning methods can easily damage paint finishes, leading to costly repairs or touch-ups. In this article, we’ll explore practical techniques and safe products to effectively clean your walls without compromising their appearance. Whether you’re dealing with dust, stains, or more stubborn marks, you’ll learn how to restore your walls while preserving the paint job.
Assessing the Condition of Your Walls

Before starting the cleaning process, it’s important to assess the condition of your walls. This evaluation helps you choose the right cleaning method and products. Begin by examining the type of paint used on your walls—flat, eggshell, or satin finishes react differently to cleaning. Look for stains and decide on their severity; some might only require a light dusting while others need more intensive cleaning. Additionally, check for any peeling or bubbling in the paint, which might necessitate repairs before cleaning. Remember that walls in high-traffic areas, such as hallways, are likely to be dirtier than those in less-used rooms.
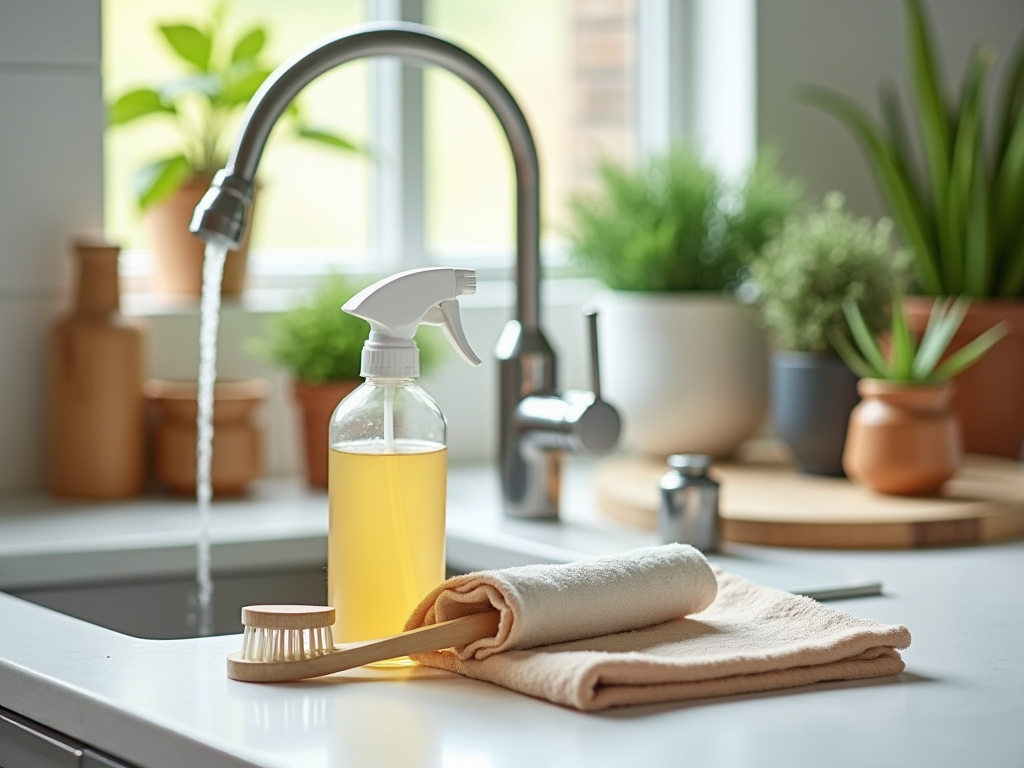
Gathering the Right Supplies

To clean your walls effectively, it’s essential to gather the right supplies. Here’s a list of items you’ll need for the job:
- Soft cloths or sponge: Choose non-abrasive materials to avoid scratching the paint.
- Bucket: For mixing cleaning solutions and rinsing cloths.
- All-purpose cleaner: A gentle, pH-balanced cleaner suited for painted surfaces.
- Magic eraser: Useful for tough stains, but use sparingly to avoid paint damage.
- Water: Ensure you use clean water for rinsing off any cleaning solution.
Having these tools ready will make the cleaning process smoother and more efficient, allowing you to focus on the task at hand.
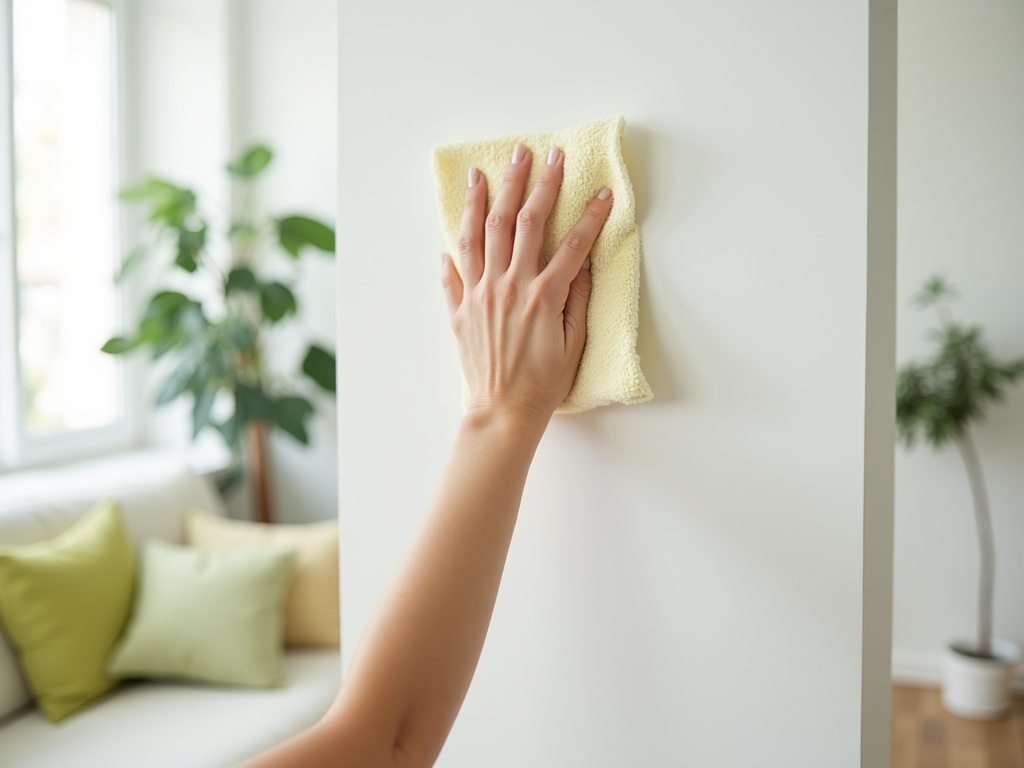
Gentle Cleaning Techniques
Once you have assessed your walls and gathered the necessary supplies, you can begin the cleaning process. Start with the least intrusive method to avoid damaging the paint:
- Dusting: Use a soft, dry cloth or a microfiber duster to remove dust and cobwebs from the wall surface.
- Spot cleaning stains: For small stains, moisten a cloth with a mild all-purpose cleaner mixed with water. Gently dab the stained area without scrubbing, as abrasive action may damage the paint.
- Washing whole walls: If the walls are significantly dirty, fill a bucket with water and add a few drops of all-purpose cleaner. Use a sponge dipped in the solution, wringing out excess liquid, and work from the bottom to the top to prevent streaks.
- Rinsing: After washing, use a clean damp cloth to wipe down the walls to remove any soap residue.
- Drying: Pat the wall dry with a soft towel or cloth to avoid water spots and potential damage.
Always test any cleaner in an inconspicuous area to ensure it won’t harm your paint finish.
While many cleaning tasks can be managed with DIY techniques, there are times when it’s best to consult a professional. If your walls have stubborn stains that do not respond to home cleaning methods, a professional painter or cleaning service can provide targeted solutions without risking damage. Additionally, if your walls show signs of mildew or extensive wear, this often requires specialized equipment and expertise to address correctly. Hiring professionals is also wise if you’re unsure about the paint type or historical finishes, as careful handling of older paints is crucial. Trusting experts ensures the integrity of your walls and prolongs their lifespan.
Conclusion
Cleaning your walls doesn’t have to be a daunting task, and by using gentle techniques and proper supplies, you can avoid damaging your paint. Start by assessing the condition of your walls, gathering appropriate cleaning tools, and employing soft cleaning methods for spot or full wall cleaning. Check for any persistent stains often found in high-traffic areas. If in doubt or faced with tough stains, consider seeking professional advice. Regular maintenance will not only keep your home looking fresh but also enhance the durability of your paint. With these tips in hand, you’ll be well-equipped to maintain your walls effectively.
Frequently Asked Questions
1. Can I use vinegar to clean painted walls?
Yes, diluted vinegar can be effective for cleaning painted walls. Mix equal parts of vinegar and water, but it’s best to test it on a hidden area first to ensure it doesn’t damage the paint.
2. How often should I clean my walls?
It is advisable to clean walls every 6-12 months or sooner if you notice buildup of dust or stains, especially in high-traffic areas.
3. What should I do about stains from crayons or markers?
For crayon or marker stains, use a magic eraser or rub a small amount of rubbing alcohol on a soft cloth to gently dab the stain without scrubbing hard.
4. Is it necessary to repaint after cleaning walls?
No, cleaning walls properly should not require repainting unless there is significant wear or damage that cleaning can’t correct.
5. Can I use bleach to clean my walls?
Bleach is not recommended for cleaning painted walls as it can strip paint and create discoloration. Use milder cleaners instead.

How to Clean a Faucet Head to Get Rid of Hard Water Spots
Hard water spots on your faucet head can be a frustrating sight, but cleaning them is simpler than you might think. In this article, we will explore effective methods for removing those unsightly mineral deposits, ensuring your faucet looks pristine. The key is to tackle the issue promptly with the right materials and techniques, making your kitchen or bathroom look fresh and new.
Understanding Hard Water Spots
Before diving into the cleaning process, it’s important to understand what hard water spots are and how they form. Hard water contains high levels of minerals such as calcium and magnesium, which can leave behind residue on your fixtures as the water evaporates. Over time, this accumulation creates hard water spots that can be stubborn and difficult to remove. In addition to being unsightly, these deposits can also affect water flow and pressure, making it essential to address them periodically.
Having the right tools and supplies on hand can make the cleaning process more efficient. Here’s a list of what you need:
- White vinegar or lemon juice
- A soft cloth or sponge
- An old toothbrush (for scrubbing)
- Plastic bag or container (if soaking)
- Water
- Baking soda (optional, for tough spots)
White vinegar and lemon juice are natural acids that easily break down mineral deposits, while a soft cloth prevents scratching the surface of your faucet. An old toothbrush is handy for reaching tight spots, and baking soda can provide extra scrubbing power for particularly stubborn buildup. Having a plastic bag or container will also allow you to soak the faucet head for a more thorough clean.
Step-by-Step Cleaning Process
Cleaning your faucet head is a straightforward procedure that can be accomplished in just a few easy steps. Here’s how to do it:
- **Prepare the Solution:** Mix equal parts of white vinegar and water in a bowl, or use straight lemon juice. If you choose to use baking soda, create a paste with water to apply later.
- **Soak the Faucet Head:** If your faucet head is removable, take it off and submerge it in the bowl. If not, soak a cloth in the solution and wrap it around the faucet head.
- **Let It Sit:** Allow the solution to soak for at least 15-30 minutes, depending on the severity of the buildup.
- **Scrub Gently:** After soaking, use the toothbrush or sponge to scrub away any remaining deposits. Be gentle to avoid damaging the finish.
- **Rinse and Dry:** Rinse the faucet head thoroughly with water and dry it with a clean cloth to prevent new spots from forming.
Following these steps will not only remove hard water spots but will also prevent further buildup. Regular maintenance is key; consider doing this cleaning process once a month for best results.
Preventing Future Hard Water Buildup
Prevention is always better than cure, and maintaining your faucet can help minimize the occurrence of hard water spots in the future. Here are some methods to consider:
- **Wipe Down After Use:** Make it a habit to wipe down your faucet with a dry towel after each use to prevent mineral buildup.
- **Install a Water Softener:** If hard water is a significant issue in your home, installing a water softener can help reduce mineral content.
- **Use Cleaning Sprays:** Consider using cleaning products designed specifically for hard water deposits, making regular upkeep easier.
- **Check for Leaks:** Regularly inspect your faucet for leaks, as they can contribute to increased mineral buildup.
Implementing these strategies can significantly enhance the longevity and appearance of your faucet, making maintenance less of a chore.
Conclusion
Cleaning a faucet head to remove hard water spots is an easy and effective task that requires minimal supplies and time. By understanding the nature of hard water and employing the right cleaning techniques, you can restore your faucet’s shine and functionality. Regular maintenance is crucial in preventing mineral deposits from accumulating, ensuring that your kitchen or bathroom remains sparkling clean. So, don’t wait—grab your cleaning supplies and give that faucet head the care it deserves!
Frequently Asked Questions
1. How often should I clean my faucet head for hard water stains?
It’s recommended to clean your faucet head at least once a month to prevent the buildup of hard water spots.
2. Can I use commercial cleaning products instead of vinegar or lemon juice?
Yes, commercial hard water stain removers can be effective as long as they are safe for the faucet’s finish. Always follow manufacturer instructions.
3. Is it safe to soak my faucet head in vinegar overnight?
Soaking for an extended period can sometimes damage certain finishes. It’s best to follow the recommended soaking time of about 15-30 minutes.
4. What should I do if the hard water spots are still visible after cleaning?
If spots persist, try using baking soda paste for tougher stains, or repeat the soaking process with fresh vinegar or lemon juice.
5. Will hard water spots damage my faucet over time?
While hard water spots are primarily aesthetic, neglecting them can lead to corrosion or degradation of the faucet finish over time, so regular cleaning is important.

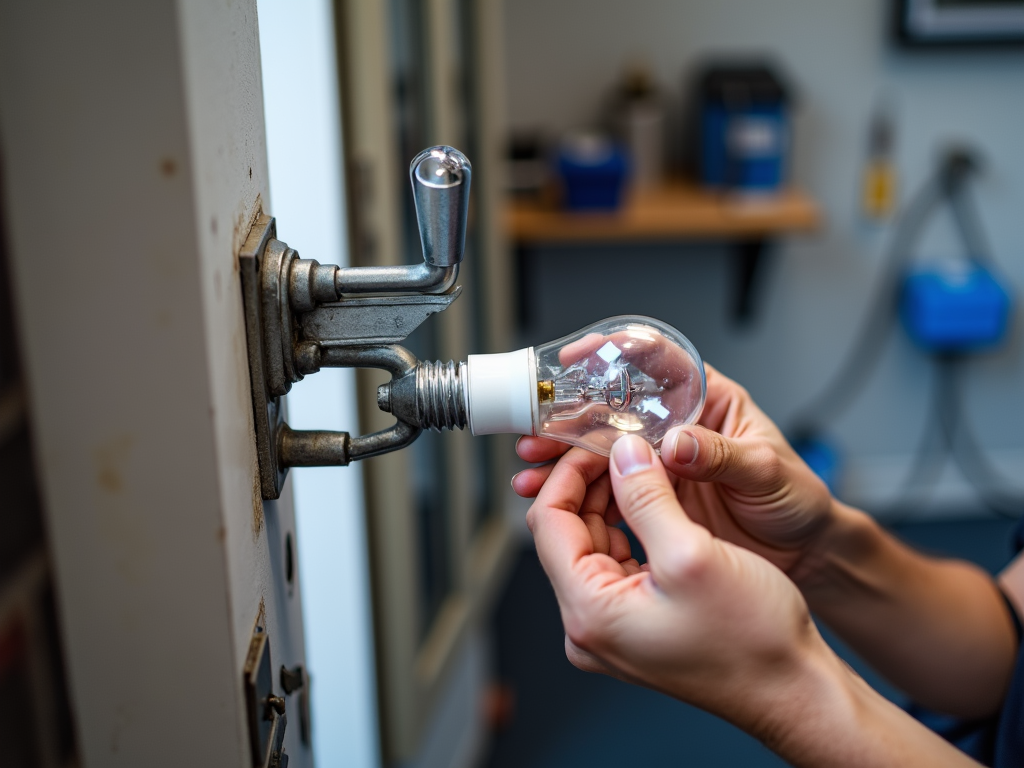
How to Remove a Broken Light Bulb: 5 Methods
Dealing with a broken light bulb can be frustrating and dangerous, but knowing how to remove it safely is essential. This article covers five effective methods for removing a broken light bulb, ensuring that you eliminate the risk of injury while restoring light to your space. Each technique is tailored to different situations, giving you the flexibility to choose the best approach for your needs. Read on to find out how to tackle this common household issue with confidence and safety.
1. Use a Pair of Pliers

If the base of the broken light bulb is still visible and intact, using a pair of pliers could be the easiest solution. By gripping the jagged edges of the bulb with needle-nose pliers, you can twist and pull it out from the socket. Here’s how to effectively use this method:
- Ensure the power is off and the light fixture is cool.
- Use safety glasses and gloves for protection.
- Gently insert the pliers into the bulb base and grip it firmly.
- Twist the pliers counterclockwise while gently pulling to remove the bulb.
- Carefully dispose of the broken glass and bulb remnants.
This method is simple and effective if you have access to the bulb base. However, always exercise caution to avoid cuts or injuries.
2. The Potato Trick
For those who prefer a creative approach, using a potato can be surprisingly effective. This method is particularly beneficial if the bulb breaks and leaves glass stuck in the socket. Here’s how to proceed:
- Select a raw potato that’s firm and larger than the bulb’s base.
- Cut the potato in half and press the cut side into the broken bulb base.
- Twist the potato counterclockwise to unscrew the broken glass.
- Dispose of the potato and the glass safely.
- Ensure to clean the area to remove any small glass fragments.
This method is excellent for reducing the risk of injury and can be a fun way to tackle a household problem.
3. Duct Tape Solution
Duct tape is known for its versatility, and it can also help you to remove a broken bulb. This technique works well when there is enough glass remaining to grab onto. Follow these steps for a successful retrieval:
- Turn off the power and ensure the fixture is cool.
- Take a length of duct tape and stick it firmly to the broken bulb base.
- Twist the tape in the direction of the threads to unscrew.
- Pull steadily to remove the bulb cleanly.
- Dispose of the remains and clean the area properly.
Using duct tape minimizes the risk of cuts and provides a secure grip on sharp edges.
4. Use a Broken Bulb Remover Tool
If this is a frequent problem or you’re looking for a long-term solution, investing in a broken bulb remover tool can be a wise choice. Designed specifically for this purpose, these tools provide a safe way to remove broken bulbs. Here’s how to use it:
- Purchase a broken bulb remover tool from a hardware store.
- Follow the instructions provided with the tool.
- Place the tool’s gripping end onto the base of the broken bulb.
- Turn the handle or twist according to the tool’s design.
- Carefully remove the bulb and dispose of it appropriately.
This tool is efficient and generally safer than trying to remove the bulb with makeshift methods.
5. Call a Professional
Sometimes, the safest route is to call in a professional, especially if you feel uneasy about dealing with the broken bulb. Electricians are equipped with the right tools and techniques to handle such situations without risk. Consider these points when opting for professional assistance:
- Your safety is the priority; professionals minimize risks.
- They can also inspect the fixture for any potential damage.
- It saves you time and effort for complicated fixtures.
- Helps to avoid further accidents or injuries.
- Professional service can be worth the cost for peace of mind.
When in doubt, contacting a skilled electrician is always a wise decision to ensure complete safety.
Conclusion
Removing a broken light bulb may seem daunting, but with the right methods, you can handle the situation safely and effectively. Whether you opt for pliers, the potato trick, duct tape, a specialized tool, or even professional help, always prioritize your safety first. Understanding how to manage broken bulbs not only protects you from injury but also ensures your home remains well-lit and functional. Don’t forget to dispose of any broken glass responsibly to prevent hazards in your living space.
Frequently Asked Questions
1. Is it safe to remove a broken light bulb without turning off the power?
No, always turn off the power to the light fixture before attempting to remove a broken bulb to avoid electric shock.
2. What should I do if I can’t remove the broken bulb?
If you’re struggling to remove the broken bulb, it may be best to call an electrician who has the tools and experience to safely handle it.
3. Can I use my hand to remove the broken bulb?
No, using your hands can lead to serious cuts. Always use tools or methods that protect your hands from sharp edges.
4. How can I dispose of the broken glass safely?
Wrap the broken glass in thick newspaper or cloth before disposing of it in a sturdy trash bag to prevent injuries.
5. Is there a way to prevent light bulbs from breaking?
To prevent light bulbs from breaking, handle them with care, avoid using excessive force when installing them, and ensure that fixtures are compatible with the bulb type.

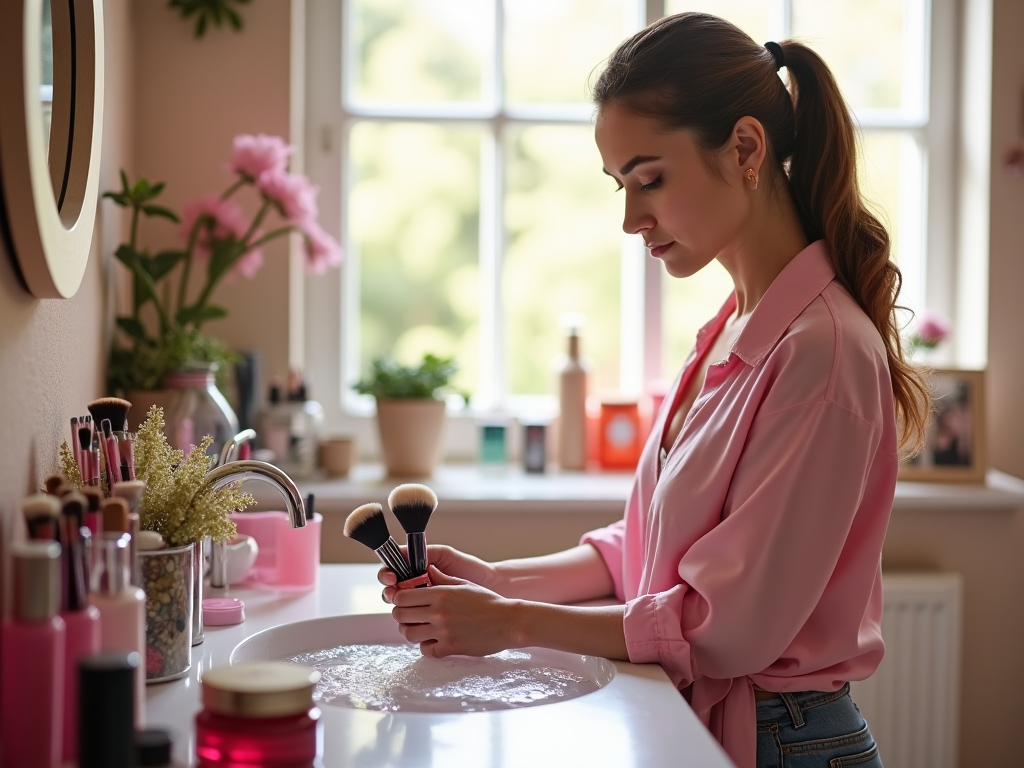
How to Clean Makeup Brushes
Makeup brushes can significantly impact the overall look and feel of your makeup application. Over time, however, these essential tools can accumulate makeup residue, oils, and bacteria, leading to less-than-ideal results. The art of cleaning your brushes effectively is not just about maintaining their appearance; it’s also about preserving their functionality and ensuring that your skin remains healthy and irritation-free. With simple steps and a few accessible supplies, you can keep your brushes in prime condition, allowing you to achieve professional results every time you sit down to glam up.
In this guide, we will take you through the nuances of brush cleaning that many overlook but are crucial to mastering makeup application. Whether you’re an avid makeup enthusiast or just starting out, understanding the importance of regular maintenance will elevate your beauty routine. Brace yourself as we demystify the process and share tips that will make cleaning your brushes a breeze.
Why Cleaning Makeup Brushes is Important
Makeup brushes are an essential tool in beauty routines, providing the means to apply various products smoothly and effectively. However, neglecting to clean them can create a host of problems. Dirty brushes may lead to skin irritations, allergies, and breakouts due to the buildup of bacteria and old product. Moreover, a well-maintained brush improves application techniques, allowing for smoother blending and even coverage. Your investment in quality brushes deserves attention, maintenance, and protection. Below, we delve deeper into the benefits of keeping your brushes clean and free from grime.
Signs Your Makeup Brushes Need Cleaning

Knowing when to clean your brushes is vital for those who want to maintain optimal performance. Here are some indicators to look out for:
- Product buildup on the brush bristles.
- A change in texture or stiffness of the bristles.
- An off-putting smell that indicates oils and dirt are lingering.
- Brushes that leave streaks or uneven application on the skin.
- Changes in color when applied to the skin compared to how they looked when new.
What You Need for Cleaning Your Makeup Brushes
To effectively clean your makeup brushes, it’s crucial to gather the right supplies. Here’s a list of what you’ll need:
- Gentle cleanser (soap or specialized brush cleaner)
- Olive oil (to keep brushes conditioned)
- A clean towel
- A bowl or sink for rinsing
- Optionally, a silicone brush cleaning mat for deeper cleaning
Now that you’re equipped with all the supplies, let’s delve into a step-by-step guide detailing how to clean your brushes methodically.
Step-by-Step Guide to Cleaning Makeup Brushes
Preparing Your Area
Before starting, it’s essential to set up a dedicated cleaning area. Clear off a surface, ensuring it is clean and free from clutter. Assemble all the supplies nearby for easy access. This organization will save you time and make the process feel more manageable. Taking just a few moments to prepare your environment can drastically improve your cleaning experience.
Cleaning Techniques
There are various methods to clean your brushes effectively. Below, we discuss two popular techniques in detail:
The Soap and Water Method
| Step | Description |
|---|---|
| 1 | Wet the bristles with lukewarm water. |
| 2 | Add a small amount of gentle cleaner to a bowl. |
| 3 | Swirl the brush in the cleaner and work gently with your fingers. |
| 4 | Rinse thoroughly until the water runs clear. |
| 5 | Reshape the bristles and lay flat to dry. |
The Olive Oil Method (for deeper cleaning)
An alternative to the soap and water method involves using olive oil. This technique works best for brushes that have caked-on makeup.
- Mix one part olive oil with two parts gentle cleanser in a bowl.
- Dip the bristles into the mixture and gently swirl.
- Rinse thoroughly and reshape the bristles before laying them flat to dry.
Drying Your Brushes
The drying process plays a pivotal role in maintaining the integrity of your brushes. Always lay brushes flat on a clean towel rather than standing them upright. This approach prevents water from seeping into the ferrule, which can lead to bristle shedding and deterioration over time. Ensuring your brushes have ample drying time is essential for their longevity. Ideally, let your brushes dry overnight to ensure they are fully ready for the next use.
Conclusion
Regularly cleaning your makeup brushes not only prolongs their lifespan but also promotes better skin health. By following these simple steps, you can ensure that your brushes remain in top condition for every makeup session. Your skin will thank you for the extra care, and your makeup application will improve, leading to flawless results every time. Keeping your brushes clean may seem like a chore, but with a little preparation and the right techniques, it can become a manageable and rewarding part of your beauty routine.
Frequently Asked Questions
- How often should I clean my makeup brushes? It is recommended to clean brushes used for liquid products weekly, while powder brushes can be cleaned every 2-4 weeks.
- Can I use household soap to clean my brushes? Yes, but it’s best to use a gentle soap free of harsh chemicals. Specialized brush cleaners are also a great option.
- What should I do if my brushes have a strong odor? Clean your brushes thoroughly with a soap that helps eliminate odors, and ensure they are completely dry before storing.
- Is it necessary to reshape my brushes while drying? Yes, reshaping helps maintain their form and prevents bristles from splaying, ensuring optimal application in the future.
- Can I use alcohol to clean my brushes? While rubbing alcohol can be effective for disinfecting, it can also dry out the bristles. Use it sparingly and always follow with a conditioner if you choose this method.
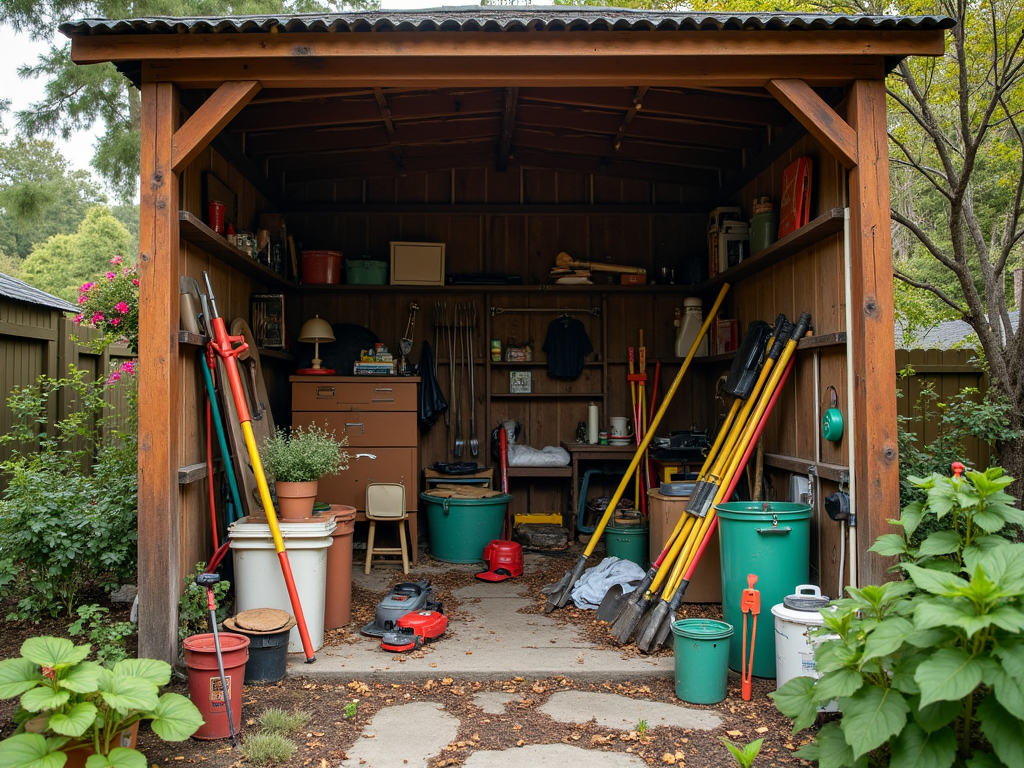
4 Tips to Help You Organize Your Shed or Garage
Transforming your shed or garage into an organized and functional space can be a game-changer for your home. These areas often serve as the catch-all for tools, gardening equipment, and seasonal decorations, leading to chaos that can make finding items near impossible. The process of organization offers not just efficiency but also the peace of mind that comes with order. By implementing a few strategic tips, you can reclaim your space, reduce clutter, and enjoy accessible storage solutions. This article aims to guide you through essential steps that will make your shed or garage both functional and aesthetically pleasing.
One of the key aspects of maintaining a clutter-free area is the practice of regular cleaning throughout the year. Cleaning allows you to evaluate what you currently have on hand, helping to avoid future accumulation of unnecessary items. It sets the foundation upon which you can build an organized and accessible storage system. You’ll discover essential tools and supplies that you may have forgotten about, and it presents an opportunity to invest in new storage methods. Let’s dive deeper into the steps required to achieve a well-organized shed or garage.
Understand What You Have

To begin the organization process, it’s essential to take stock of the items in your shed or garage. Clutter can accumulate quickly, making it easy to lose track of what you actually own. Pulling everything out into a clear space allows for a better overview of your possessions. Once items are spread out, you’re in a better position to assess their condition, value, and frequency of use. Grouping items into categories can reveal how much you truly have and help you prioritize what needs to be kept, tossed, or donated. Creating a clear visual representation of your inventory is an excellent first step.
- Gather Everything: Pull all items out into a designated area.
- Group Similar Items: Create categories such as tools, gardening supplies, and seasonal decorations.
- Assess Condition: Check for rust, dirt, or wear and decide if items need to be repaired or discarded.
Declutter and Get Rid of Unused Items
Once you have a clear view of your items, it’s time to determine what you really need. This step can be tough, but it’s critical for effective organization. The 12-month rule can serve as a valuable guideline here. If you haven’t used an item in the past year, consider donating or disposing of it. Be honest with yourself while evaluating the sentiment surrounding various items. If it’s not serving you, let it go—a clutter-free space will be well worth the emotional sacrifice.
- Evaluate Usage: Review items critically and decide their utility.
- Make a Decision: Can you envision using this object in the future?
- Sort Out: Create a pile for items to keep, sell, or donate.
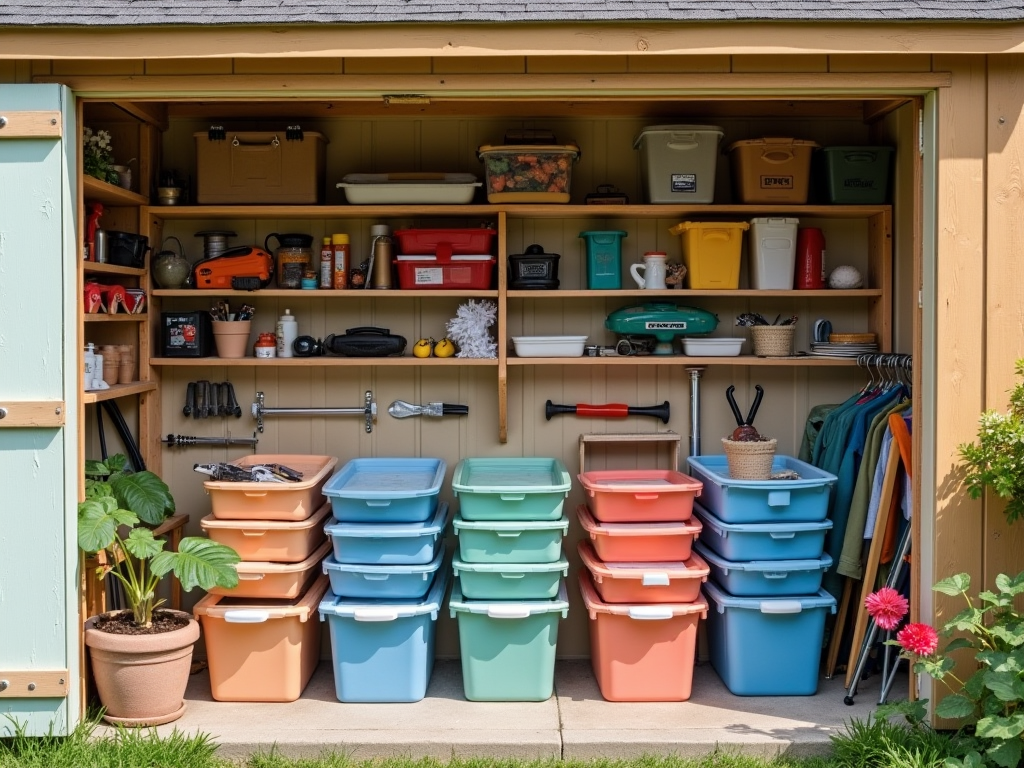
Invest in Smart Storage Solutions
A well-organized shed or garage relies heavily on effective storage solutions. Thoughtful investments can dramatically transform your space. Modular shelving can help maximize vertical storage, allowing you specific zones for different categories of items. Transparent storage containers can also be highly beneficial; they help you easily identify what’s inside without unnecessary rummaging. For larger equipment, pegboards and hooks offer a savvy and stylish way to store items like bicycles or tools. Investing in the right storage solutions can streamline your efforts, making everyday access easier.
| Storage Solution | Benefits |
|---|---|
| Shelving Units | Maximizes vertical space and keeps items off the floor. |
| Clear Bins | Easy visibility for contents; reduces time spent searching. |
| Pegboards | Utilizes wall space for tools and equipment. |
Maintain Your Organization System
After you’ve organized your shed or garage, it’s important to maintain the system you’ve put in place. With time, clutter can return if regular upkeep is not prioritized. Consider creating a routine where you check in on the organization status once a month. Allocating a specific day for this task makes it easier to remember. Encourage family members or household members to return items to their designated spaces after use. This habit creates a culture where everyone contributes to the overall organization success.
- Monthly Check-Ins: Dedicate a day each month for assessment and realignment.
- Encourage Cleanliness: Promote the importance of putting items back after use.
- Make Adjustments: If certain areas are becoming cluttered again, adjust your organization system accordingly.
Conclusion
Organizing your shed or garage doesn’t have to be a daunting task. By understanding what you have, decluttering, investing in the right storage solutions, and maintaining order, you can create a functional and efficient space. A well-organized area enhances accessibility and makes the best use of your available space. Not only do these steps make it easier to locate what you need, but they also free up time and mental energy for other priorities in your life.
Frequently Asked Questions
- What should I do if I have too many items to organize? Start by setting aside a few hours to focus on one category at a time. Break the task into manageable parts to avoid feeling overwhelmed.
- How often should I organize my shed or garage? It’s advisable to conduct a thorough organization at least once a year, with smaller maintenance checks every few months.
- What is the best way to dispose of unwanted items? You can donate usable items to local charities, sell them online, or arrange for a bulk waste pickup for broken or unusable items.
- Should I label my storage bins? Yes, labeling storage bins helps you quickly identify their contents, making it easier to find what you need without searching through multiple boxes.
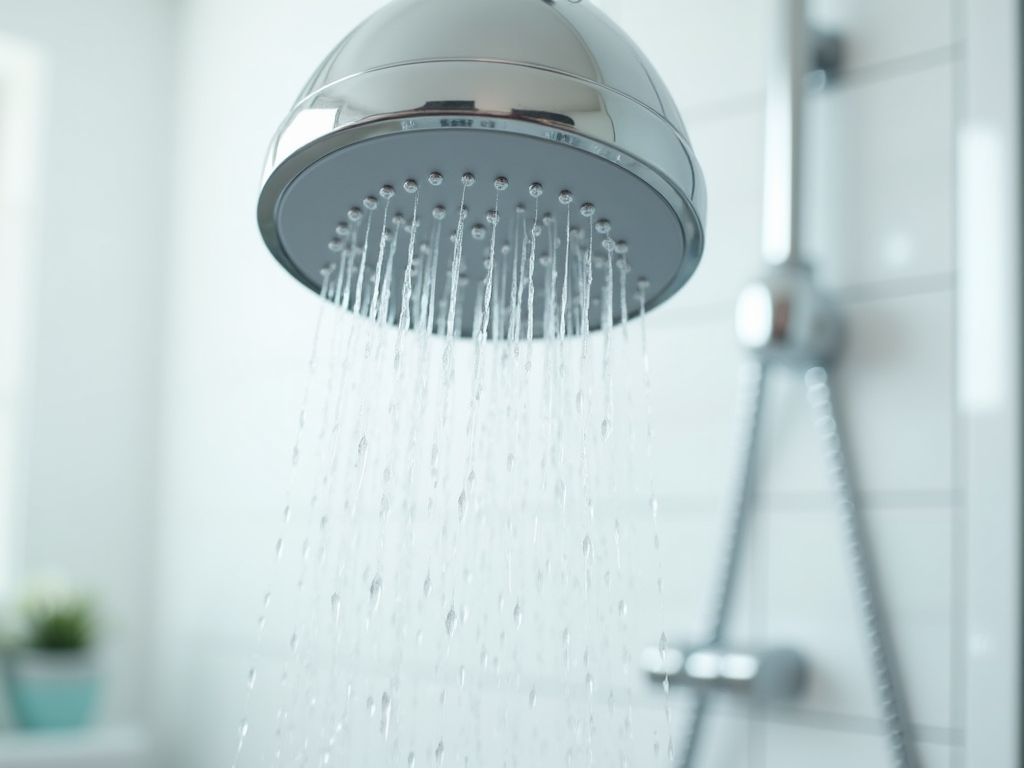
How to Clean a Showerhead
Your showerhead is a vital component of your daily routine, playing a key role in providing a refreshing and invigorating experience. However, over time, it can accumulate grime, mineral deposits, and even bacteria. This buildup can lead to reduced water flow, creating a frustrating shower experience. Cleaning your showerhead not only helps maintain optimal water pressure but also contributes to a hygienic bathing environment. Regular maintenance ensures that every shower is as rejuvenating as it should be. In this guide, you’ll discover various effective methods to clean your showerhead, along with tips to keep it in pristine condition.
Why Cleaning Your Showerhead is Important
Many people neglect their showerheads, unaware of the potential consequences. A dirty showerhead can harbor bacteria and mold, presenting health risks for you and your family. It’s also common for mineral deposits, particularly in hard water areas, to accumulate over time and affect water flow. Regular cleaning can help mitigate these issues and maintain water quality. Not only does a clean showerhead enhance your shower experience, but it can also prolong the lifespan of the fixture. By implementing a simple cleaning routine, you can enjoy both improved performance and peace of mind.
Methods for Cleaning a Showerhead
There are several effective methods to clean your showerhead, whether it’s removable or fixed in place. Below are some popular techniques that can easily tackle buildup and restore your showerhead’s functionality.
Vinegar Soak Method
The vinegar soak method is straightforward and highly effective for removing mineral deposits.
- Begin by removing the showerhead from the pipe.
- Soak it in a bowl filled with white vinegar for about an hour.
- After soaking, scrub any remaining deposits with an old toothbrush.
- Rinse thoroughly with water before reattaching.
- For fixed showerheads, follow a similar process by sealing the head in a plastic bag filled with vinegar.
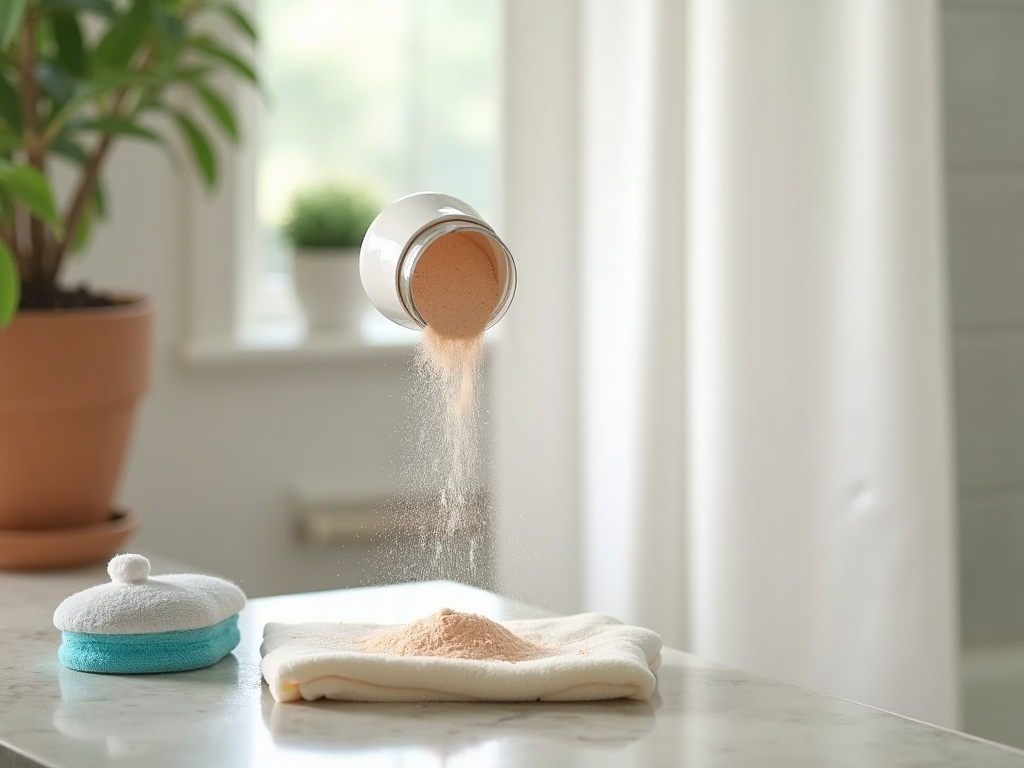
Baking Soda Paste
Baking soda can be a powerful ally against stubborn stains and odors. To put this method to work:
- Mix three parts baking soda with one part water to create a thick paste.
- Apply the paste generously to the showerhead, targeting heavily affected areas.
- Let it sit for 10-15 minutes, allowing the baking soda to break down the grime.
- After the wait, scrub the head gently and then rinse well.
- This method not only cleans but also gives off a nice, fresh scent.
Commercial Cleaner Method
If household solutions don’t provide the desired results, consider employing commercial cleaners designed for bathroom fixtures. These products offer a potent alternative but come with precautions:
- Always read the instructions on the product label.
- Ensure to protect your skin and eyes while using chemical cleaners.
- Thoroughly rinse the showerhead after cleaning to eliminate chemical residues.
| Method | Time Required | Effectiveness |
|---|---|---|
| Vinegar Soak | 1 hour | High |
| Baking Soda Paste | 20 minutes | Moderate |
| Commercial Cleaner | Varies | Very High |
Maintenance Tips
In addition to cleaning your showerhead, implementing routine maintenance practices can greatly reduce the frequency of deep cleaning. Here are some tips to keep it looking and functioning its best:
- Wipe it Down: Regularly wipe the showerhead with a cloth after each use to prevent soap scum buildup.
- Vinegar Soak: Incorporate a vinegar soak every few months as part of your cleaning schedule.
- Water Filters: Consider installing a water filter to decrease mineral deposits in your water supply.
Conclusion
To ensure a clean and refreshing shower experience, routine maintenance of your showerhead is essential. Employing the methods outlined in this guide will allow you to keep your fixture in excellent condition, enhancing both longevity and water quality. With just a little effort, you can achieve a sparkling clean showerhead that not only looks great but also functions optimally. Implement these cleaning techniques and preventative measures, and you’ll enjoy satisfying and hygienic showers for years to come.
Frequently Asked Questions
- How often should I clean my showerhead? It is recommended to clean your showerhead every 1-3 months, depending on the mineral content of your water.
- Can I use bleach to clean my showerhead? It’s not advisable to use bleach, as it can damage the finish and materials of the showerhead. Stick to vinegar or baking soda instead.
- What if my showerhead is fixed and can’t be removed? You can fill a plastic bag with vinegar and secure it around the showerhead, allowing it to soak while still attached.
- Will cleaning my showerhead improve water pressure? Yes, by removing mineral deposits, you can often restore water pressure and flow significantly.
- Is it safe to soak a plastic showerhead in vinegar? Most plastic showerheads can be safely soaked in vinegar; however, check the manufacturer’s instructions to be sure.

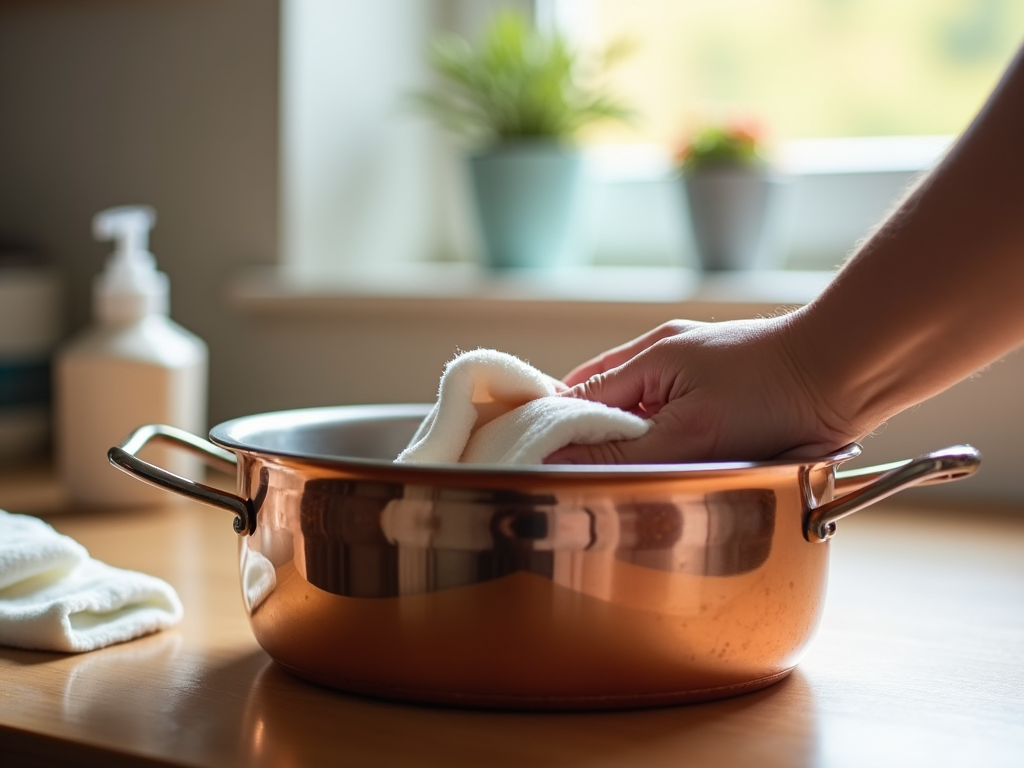
How to Clean and Care for Copper Cookware
If you’ve ever cooked with copper cookware, you know that it can elevate your culinary experience. Not only does it boast superior heat conductivity, but it also offers an aesthetic appeal that can shine in any kitchen. However, maintaining its beauty and function requires more than just a quick wash. Proper care and cleaning practices are essential to avoid tarnishing and damage. Fortunately, with a few simple steps and natural cleaning techniques, you can keep your copper pots and pans looking pristine and performing at their best. Let’s dive deeper into how to preserve the quality of your cherished copper cookware.
Understanding Copper Cookware

The beauty of copper cookware lies not only in its shiny surface but also in its functionality. Copper is an excellent conductor of heat, allowing for even cooking temperatures. This quality makes it a preferred choice among professional chefs and cooking enthusiasts alike. However, the shine that makes copper so appealing can quickly fade without proper care. Understanding the nature of the material can help you take the right actions to extend its lifespan. Let’s explore the importance of correct cleaning and care methods.
The Importance of Proper Cleaning
Cleaning your copper cookware correctly is crucial for preserving its appearance and performance. Over time, copper can tarnish and develop a patina due to exposure to air and moisture. Regular and proper cleaning helps mitigate these effects, ensuring that your cookware maintains its striking look and excellent heat conductivity. Additionally, many of us are misled into thinking that harsh chemicals are necessary for cleaning. Conversely, gentle, natural solutions often yield effective results without causing harm to either the cookware or your health. Learning the right approach can save you time and effort while enhancing the longevity of your copper items.
One prevalent myth is that copper cookware requires severe scrubbing and chemical cleaners to restore its shine. In reality, many natural household items can achieve wonderful results. It’s also a misconception that once tarnished, copper cannot be returned to its original luster. Simple cleaning techniques can easily revive your cookware. By educating ourselves on these misconceptions, we can avoid damaging our precious kitchen tools and keep them looking their best for years to come.
Essential Cleaning Supplies
Before you start cleaning your copper cookware, it’s helpful to gather the necessary supplies. Here is a list of items you will need:
- Mild dish soap
- Baking soda
- White vinegar or lemon juice
- Soft cloths and sponges
- A soft-bristled brush
- Copper polish (optional)
Step-by-Step Cleaning Process
Cleaning your copper cookware can be a straightforward process if you follow these steps:
- Initial Rinse: Start by rinsing your copper cookware with warm water to remove any food residue.
- Soak in Soapy Water: Fill your sink with warm, soapy water and let your cookware soak for about 15-20 minutes.
- Gentle Scrubbing: Use a soft sponge or cloth to scrub the surface gently, focusing on areas with stuck-on food.
- Tarnish Removal: For tarnished areas, create a paste with baking soda and vinegar or lemon juice. Apply the paste with a soft cloth, rub gently, and rinse thoroughly.
- Drying: Immediately dry your cookware with a soft towel to avoid water spots.
| Material | Care Instructions |
|---|---|
| Copper | Use mild soap and avoid abrasives. |
| Stainless Steel | Clean with a stainless steel cleaner for best results. |
| Non-stick | Use a soft sponge and avoid metal utensils. |
Long-term Care Tips for Copper Cookware
To ensure your copper cookware remains in optimal condition, consider the following maintenance tips:
- Avoid High Heat: High temperatures can cause discoloration and warping. Use medium to low heat for best results.
- Regular Cleaning: Clean your cookware after every use to prevent buildup.
- Do Not Use Abrasives: Stay away from steel wool or harsh scrubbing pads that can scratch the surface.
Conclusion
Maintaining copper cookware is not just about cleaning; it’s about understanding the material and treating it with the care it deserves. By following the right techniques and guidelines discussed in this article, you can ensure that your copper pots and pans remain functional and visually stunning for years. With a little time and effort, you can avoid tarnishing and preserve the performance of your cookware. Remember, copper cookware is an investment, and taking care of it will reward you with beautiful cooking experiences for a long time. Happy cooking!
Frequently Asked Questions
- How often should I clean my copper cookware? Clean your copper cookware after each use to maintain its shine and performance.
- Can I use steel wool on copper cookware? No, steel wool can scratch and damage the surface of copper. Use soft cloths or sponges instead.
- What is the best natural cleaner for copper? A paste made from baking soda and vinegar or lemon juice is effective and natural for cleaning copper.
- Is it safe to use copper cookware on all types of stovetops? Copper cookware is suitable for most stovetops, but check for specific product guidelines, especially for induction cooktops.
- How can I prevent tarnishing in the future? Regular cleaning and avoiding contact with acidic foods can help prevent tarnish over time.

How to Clean Your Shower Curtain
A shower curtain can transform your bathroom aesthetics and provide an essential barrier to keep water where it belongs. However, with time, these stylish barriers can become breeding grounds for mildew and grime if not properly maintained. Regular cleaning is essential, not just for the curtain’s appearance, but for your personal hygiene and the overall health of your bathroom environment. When it comes to cleaning, understanding the materials that comprise your shower curtain is key to employing the most effective methods. This guide will lead you through the steps needed to restore freshness to your shower curtain. Let’s immerse ourselves in the details of how to maintain this essential element of your bathroom.
Understanding Your Shower Curtain Material

Before venturing into cleaning methods, the first step is identifying the material of your shower curtain. Different materials demand different approaches to cleaning, and knowing this will save you time and effort. Common options include plastic, fabric, and vinyl, each bringing its own set of advantages and cleaning requirements. For instance, plastic curtains may be easy to wipe down, while fabric curtains often require machine washing. Vinyl curtains, on the other hand, possess durability and water resistance but can sometimes develop stains that need specialized treatment. Familiarizing yourself with these materials sets the stage for effective cleaning routines tailored to each unique texture.
- Plastic (PEVA or PVC): Waterproof and easy to clean, but prone to mildew.
- Fabric: Often made from cotton or polyester, requiring machine washing.
- Vinyl: Durable yet can become discolored over time.
Essential Cleaning Supplies
Preparing the right set of cleaning supplies is crucial for effective cleaning. Various tools and solutions can help you tackle stubborn stains, mold, and general dirt buildup efficiently. Start with common household items like mild detergent and vinegar, both of which are excellent for cutting through grime effectively. Baking soda serves as a fantastic abrasive cleaner for tough stains, making it a must-have in your cleaning arsenal. When cleaning, ensure you have a soft brush or sponge to avoid damaging your curtain’s material. If your curtain is machine-washable, a washing machine can greatly simplify the cleaning process.
- Mild detergent or vinegar
- Baking soda (for tough stains)
- Soft brush or sponge
- Washing machine (if applicable)
- Shower curtain hooks (optional, for easy removal)
Cleaning Methods Based on Material
Once you’ve gathered your supplies, it’s time to dive into the specific methods tailored by material type. For a plastic shower curtain, using natural ingredients like vinegar creates an effective cleansing solution, cutting through soap scum and mildew easily. Fabric shower curtains can be machine washed for a thorough cleanse if they meet the care requirements. Vinyl curtains, being somewhat unique, can be scrubbed with a homemade baking soda paste that lifts even the most stubborn stains. Let’s discuss each method in detail to ensure you achieve the preferred results.
| Material | Cleaning Method | Drying Recommendation |
|---|---|---|
| Plastic | Wipe with vinegar solution; rinse | Hang to dry |
| Fabric | Machine wash; mild detergent | Air dry, avoid sun |
| Vinyl | Scrub with baking soda paste; rinse | Hang to dry |
Preventing Future Mildew and Stains
Prevention is the best remedy, especially when it comes to mildew and stains. Implementing effective habits can significantly extend the life of your shower curtain while maintaining its appearance. Regular cleaning should be part of your cleaning routine, ideally every month. Furthermore, ensuring proper ventilation in your bathroom can drastically reduce humidity levels and subsequent mildew growth. After each shower, take a moment to fully close the curtain so it can dry out properly. These practices not only keep your curtain looking great but also promote a healthier bathroom environment overall.
- Clean your shower curtain every few months.
- Ventilate your bathroom to reduce humidity.
- Pull the curtain closed after usage to dry.
Conclusion
By implementing these practical cleaning methods and preventive measures, you can easily keep your shower curtain looking fresh. Cleaning does not have to be an overwhelming chore; understanding the material and using the right techniques transforms it into a manageable task. Regular maintenance is crucial, not just for aesthetic purposes but also for a healthier living space. So, grab your supplies, roll up your sleeves, and give your shower curtain the care it deserves. A little effort goes a long way in ensuring your bathroom remains a clean and inviting space.
Frequently Asked Questions
- How often should I clean my shower curtain? Regular cleaning every month is recommended to prevent mildew and stains.
- Can I put my plastic shower curtain in the washing machine? Yes, but check the label first. Most plastic curtains can be machine washed on a gentle cycle.
- What should I do if my shower curtain has stubborn stains? Try using a baking soda paste for scrubbing tough stains before rinsing.
- Is it safe to use bleach on shower curtains? Bleach can be harsh; it’s better to use vinegar or baking soda to avoid damaging the curtain fabric.
- How can I prevent mildew from forming on my shower curtain? Ensure proper ventilation in the bathroom, and allow the curtain to dry fully after each use.